
Our Electrical System

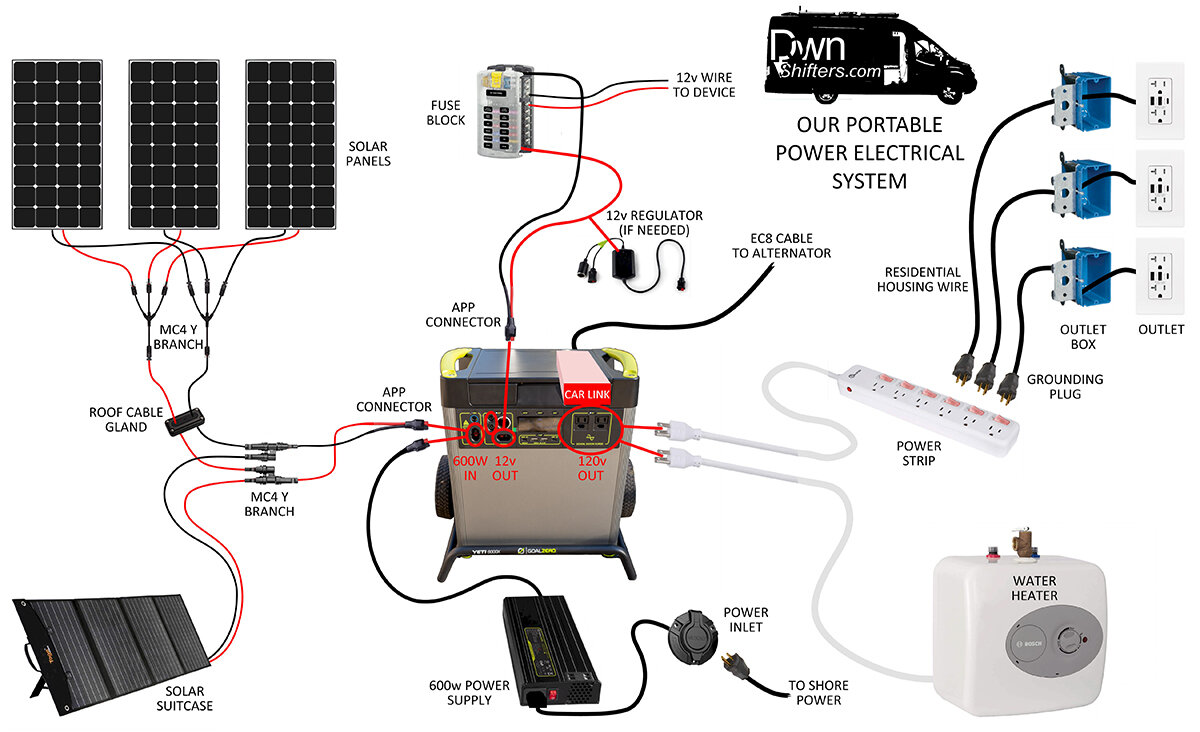
This diagram illustrates our full electrical system
If you lack electrical knowledge, adding a power system to your DIY build can be intimidating. For us, the decision to use a pre-built, portable system was done for two reasons.
We wanted to reduce the time it would take to build some of our systems. We were crunched for time during our build. The only real option for purchasing a completed system is an electrical system, as water systems aren’t sold as complete units (that we know of).
All-in-one systems are actually reasonably priced when you compare the feature set and battery capacity compared to all the components you’d have to buy and wire in a DIY set up. Before we get a lot of hate mail - yes, it is possible to make a cheaper DIY system!
Calculating Your Electrical Needs: Electrical Terminology and Load Calculator
We are using a Goal Zero Yeti 6000x for our build. This is an upgrade from our original power station that included a GZ Yeti 3000 and Yeti 1400. If you’d like to learn more about our experience with Goal Zero, read our article or watch our video. The Yeti 6000x provides us with 556AH of lithium battery capacity. It has a number of 12v DC outputs with various connectors rated from 120w to 360w. The 120v AC inverter has two outlets that are rated at 2000w (total) with a 3600w surge protector. We use both the 12v and 120v outputs to wire our van.

12v System
All of our onboard 12v devices (Water Pump, Ventilation Fan, Natures’ Head Composting Toilet Fan, Wifi Router, Fridge, and Diesel Heater) are connected to our fuse block. Each 12v device is wired to a positive and negative terminal and then a fuse that matches the product spec is added to the circuit in the fuse block. A positive and negative wire are then wired into an APP connector that fits into the Yeti’s 12v HPP 360w port.
It’s important to total the wattage of all of your devices connected to the fuse block to ensure that you’re not exceeding 360w - if all devices were to run at the same time. If you anticipate that this could happen - it would be wise to run one of the larger wattage devices independently to either the 12v 6mm port (120w) or the 12v Car Port (160w) to avoid tripping the Yeti’s internal fuse.
Another thing to consider is whether or not the 12v outputs in your system are regulated. This is a device that keeps the output of your power system very near 12v at all times, which some devices require, like many RV fridges. The Goal Zero X series has a built-in regulator, but earlier systems did not. Here is the 12v regulator for the earlier GZ models. This regulated cable will work to regulate any 12v system.

120v System
Our Hot Water Heater and wall outlets need to be plugged into the two 120v 2000w outlets on the front face of the 6000x. Our Hot Water Heater is plugged directly into one of the two yeti outlets. The other plug is used to plug in a Power Strip with individual switches. This power strip has overload protection for each plug, which allows you to turn off plugs that aren’t in use. We also like that a power strip has surge protection, which protects your devices from being damaged.
On the power strip, we use one plug for our weBoost cell booster and then run one line per outlet from the additional open slots. Using Residential Housing Wire, we add a three wire grounding plug to one end and then wire an electrical outlet through an electrical outlet box on the other end. We repeat this for each outlet in the build. Our outlets are used for any number of items - ranging from laptops, device charging, and cooking appliances - essentially anything that you would normally power in your your home.
Our 6000x has a number of USB ports, but since the unit isn’t easy to access in our build, we purchased outlets with integrated USB-A and USB-c ports for convenience. There is marginal loss that occurs by using USB ports in the outlets, as converting the 120v power to USB voltage isn’t 100% efficient. In other words, charging your USB devices directly from the power station will save you very little - but some energy.
So far, we have discussed how to tap and distribute the stored energy in our power system, but how do we replenish it? There are a number of ways, but by and large, we replenish our 6000x via the two 365w (upgraded July 2022 from six 100w panels) solar panels on our roof. We have also recently bought an additional 120w Solar Suitcase to allow us to park in the shade on hot days or put additional panels out when it is cloudy to increase input. The HPP input (High Power Port) on the Yeti 6000x is rated at 600w with a max voltage of 50v and 50a.

Wiring in Parallel vs Series
The 50v and 50a rating is important as it dictates how we were able to wire our panels together. We connect our two 365w panels to this port. We have wired our panels in parallel as this method adds amps together, but voltage stays the same. Our panels are spec’d at ~34.2v and 10.68a.
This equation looks like this: 2 panels x 10.68amps = 21.4a @ 34.2v. This is well within the 50a & 50v limit of the HPP input.
If wired in Series, the voltage is multiplied, but the amps stay the same.
So the equation for wiring in series is 34.2v x 2 panels = 64.4v @ 10.68a. This is above the 50v rating of the unit.
Our 120v solar suitcase is also wired to the Yeti HPP input via a MC4 Y Branch, as 730w of solar is never going to give you a 730w charge, even at solar noon. (Assume max 85% of rating).
One other thing to note about Solar charging - Goal Zero has expansion modules and onboard MPPT controls, depending on the generation of power station that you are using. An MPPT controller (Maximum Power Point Tracking) makes charging via solar up to 15% more efficient - according to GZ. We highly suggest including one in your system.

How we charge our system
Is it sunny everywhere we go? No, no it isn‘t. This means that we must have alternate ways of charging our power system. In cases where the weather is inclement or we’re staying in a valley or wooded area, we use our alternator to recharge our battery. The alternator in an automobile is there to recharge the vehicle’s battery after starting and running all the electrical components - lights, radios, and other features. This alternator works best when the engine is revved and recharges at a slower rate when the engine is idling. If you tap your alternator for your portable power system, the charge will be inconsistent. Sometimes it will charge at hundreds of volts (going up a hill revving the engine) and other times it will charge at as little as 40v (going down a hill with the engine idling).
We can assure you, when your battery is low, you’ll be happy that it is recharging at all, regardless of the voltage. We spec’d a heavy-duty alternator when we ordered our van from the Ford factory, but you can also swap out your existing alternator for a heavy-duty one. Some builders have installed two alternators, so that one is dedicated to charging their “house” batteries while the other charges the vehicle. One thing to note here, is that you can charge from your solar panels AND vehicle alternator for superfast charging while driving in nice weather.
We used the Goal Zero link system and an EC8 to Ring Terminal Cable to connect our alternator to our Yeti. Make sure that you check that this system is compatible with the Yeti generation that you are currently using.

Power inlet on a dirty rear bumper
We also have one last resort for charging our battery. Sometimes we love the area we’re in so, we don’t want to drive, but the weather stinks, or we’re under a canopy of magical trees. In this case, we’ll find a local campground that has electrical hook-up sites. Once there, we can use the 600w power supply that came with our Yeti to charge our battery.
We’re using this Power Inlet to connect our van to shore power. The power supply uses the same 600w HPP port that our solar panels use, so we have to disconnect our panels and plug-in the power supply to use it. We really hate staying at paid campgrounds, but when you’re out of power, and you need to get some work done, sometimes there are few or no alternatives. The upside is that we’ll use the water hook-ups at the campground to refill our water tanks and take a long, hot shower while we’re there.
Ok - so that’s our system. We have been using this system since 2019, and it has worked out well for us. If it weren’t for the software and hardware issues that we’ve experienced with Goal Zero - we would say that it has worked flawlessly. We heat water, charge devices, cook, work on laptops, illuminate and heat our van, and so many other functions this way. We hope this article has helped you to understand how to use a portable power system to wire your DIY campervan.
HERE’S OUR TOP PICK POWER STATION FOR 2023
Have questions? Leave us a comment below!
***Disclosure - John is trained as an architect and is in no way qualified to give electrical advice to others. In this article, we are sharing our DIY knowledge and experience with our own system. Do your due diligence to follow all safety standards and protocols. If those who are more qualified than us should find erroneous definitions or facts, we welcome corrections in the comments for the betterment of all. We will update the article as errors or better practices are discovered.